


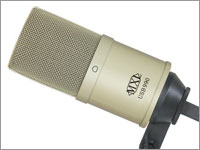
A high-quality, professional microphone is the most important piece of equipment you should put your money toward. A low-end karaoke mic doesn't quite cut it, and the mic built-in to your laptop (or any cheap computer mic) will sound thin and unprofessional. Many good options are available and they're not very expensive. The easiest and cheapest option is to get a High-quality USB mic, such as one of the following: CAD U37 USB Condenser Mic, Audio-Technica AT2020 USB Condenser Mic, Alesis USB Mic Podcast Kit, MXL 990 USB Condenser Mic. Some of these even come with desktop stands—very nice. (If you need to use more than one mic on a Mac, follow these instructions.)
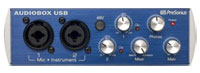
You could also use a standard microphone such as the MXL 990s Condenser Mic or the Audio-Technica AT2020 Condenser Mic, or even the trusty Shure SM58 would produce great results. To connect a standard professional mic to your computer you'll need a USB pre-amp such as the MXL Mic Mate XLR to USB Mic Interface. Or for a more elaborate setup use a nice dual-channel USB or Firewire audio interface such as the TASCAM US-144, the ART USB Dual Pre, the Presonic AudioBox USB 2X2, or the M-Audio MobilePre USB. Whatever you get, make sure it has phantom power so you can use a condenser mic with it.
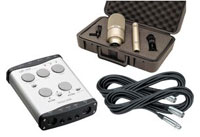
If I were starting from scratch today, this is what I would probably get: TASCAM US-144 Interface and 990/991 Microphone Pack Bundle. In that bundle you get the awesome TASCAM US-144 USB audio interface and two very nice condenser microphones: the Marshall 990 large diaphragm mic and the Marshall 991 small condenser mic. I've used both of these mics in the past and they sound great. All for 200 dollars. Use the 990 for your voice and use the extra 991 for an in-studio interview (or put it on your acoustic guitar to add a little musical accompanyment for your podcast!)
You'll need a set of headphones too. Don't use a cheap little WalkMan-style set, or the tiny ear-bud variety. Get a set of studio headphones. Since you're only dealing with voice, you don't even need an expensive set. Even the low-end $15 Sony MDR-V150 would work fine for podcasting. Or, for a little more money you can get the much higher quality Sony MDR-V6.
No need to spend hundreds of dollars on professional audio engineering software. Quite frankly, the best application, by far, for producing podcasts is Apple's GarageBand. The interface is very intuitive and easy to use, it applies effects in realtime to your dry voice track, it's very easy to set the metadata (title, artist, etc) and add photographs (album art) to the podcast, and the standard "Male Voice" and "Female Voice" presets are perfect for podcasting (just a hint of reverb to make you sound like a professional radio talk show host). If you already have a Mac use GarageBand! If you don't have a Mac, go get a used iMac on eBay (make sure it has at least a Core2Duo processor) so that you can use GarageBand. It is so worth it.
But if you don't have a Mac, several free, open-source audio applications are available, and they all work perfectly fine for recording and editing podcasts. Audacity has been around for many years, has a huge array of editing capabilities, and is available for Mac OS X, Linux, and Windows. The only downside (and it's a big one) is that it does not yet support real-time effects. So it's rather complicated just to add a little reverb to your voice to make you sound more professional. For Mac OS X or Linux users, the Ardour Digital Audio Workstation (DAW) app is an excellent choice. And Traverso is another open-source DAW that runs on Mac OS X, Linux, or Windows. Lastly, there's a new kid on the block for Windows and Linux named Jokosher, which aims to be very easy to use to compete with Apple's GarageBand. It's still fairly young, but looks very promising. Certainly worth a try if you don't have a Mac.
Do not record your podcasts directly into MP3. Each time you edit them and mix them with other files you have to re-encode, resulting in a loss of quality every time. Instead, you should save the original recordings and your archives (you do keep archives, right?) in a lossless compression format, either the open-source FLAC or WavPack formats, or the proprietary Apple-Lossless format, both of which will result in files half the size of WAV or AIFF and allow you to edit them as much as you need without losing any of the audio information or degrading quality. These are your master recordings which you will work with when putting together the final podcast. Once you're finished, then you export the final podcast into an MP3 file.
When you use higher encoding settings than those required by your content, you are filling up your listeners' hard drives and iPods with files that are much larger (often more than twice as large) than necessary. Most podcasts are merely voice recordings with a short music track thrown onto the beginning. Setting your bit rate higher than 48 kbps, or using stereo instead of mono, does not improve the quality of your podcast in the slightest.
On the flip side of that, a sample frequency of 11 kHz, or bit rates less than 48 kbps will have noticeable, distracting artifacts which will make the podcast difficult to listen to or understand. At 32 kbps, for example, your listeners will notice that your podcast is of low quality. At 16 kbps the podcast will be so unpleasant to listen to that your listeners will most likely turn you off.
When you're ready to save the final podcast, do not encode at 128 kbps stereo CBR. You'll only end up with files well over twice the size they need to be with no gain in quality. Use the following settings for high quality with low file size of voice-only podcasts:
Endocing type: Variable bit rate (VBR) VBR Quality: High* Average bit rate: 48 kbps** Sample Frequency: 44 kHz Channels: Mono
* When using the LAME encoder, VBR Quality refers to the "-q" setting, not the "-V" setting (which controls the bitrate). You should use the following: "-V 7 -q 0 -m m"

** iTunes (for some bizarre reason) only gives you the option to set the "Stereo Bit Rate," even when you choose Mono. So when you choose Mono it will simply cut this bit rate in half. Thus, only in iTunes you need to choose a 96 kbps Stereo Bit Rate in order to achieve a 48 kbps Mono Bit Rate. (Thanks for the confusion, Apple.)
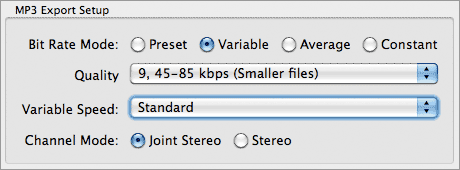
The following three figures show how to set the MP3 settings in Audacity's Export command. First you enter your ID3 tag information for this episode. Again, you should always use the same Artist Name, Album Title and Genre for all episodes of the same podcast. When you get to the Save dialog box, choose MP3 and click on the "Options..." button. In the options, make sure you choose, Bit Rate Mode: Variable, Quality: 9, and Channel Mode: Joint Stereo. Note that for some inexplicable reason, Audacity does not allow you to set your MP3 to mono. You're only options are Stereo and Joint Stereo. Use Joint Stereo, which will combine the channels at spots where the left and right channels are exactly the same. This makes it all the more important to mix all of your tracks down to a single mono channel before exporting.
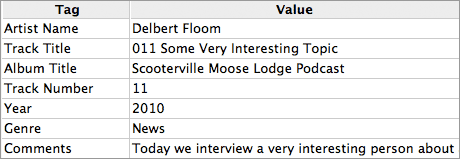

This is very important. You need to come up with one official way to display the name of your podcast and enter it that way into the "Album" ID3 tag of every episode's MP3 file. The Album field should never change from episode to episode, so give a little thought to the name of your podcast before making it available. Be descriptive but concise, and avoid extraneous words. If you use something like: "The Official Podcast of the Scooterville Moose Lodge," chances are an MP3 player will only display: "The Official Podcast of th..." Not very useful to the listener. Better to go with something like: "Scooterville Moose Lodge Podcast."
Screen real estate is in short supply on portable MP3 players. A list of audio titles on these typically small screens only has room to show the first 25 to 35 characters for each. Episode titles should concisely describe the main topic (or topics) of that particular episode. Do not include the name of your podcast or the date of the episode in the title of every episode. Those two pieces of information have their own dedicated ID3 tags.
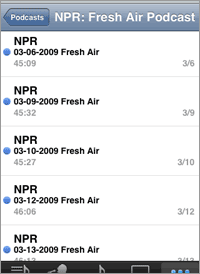
Notice the illustration to the right. The date for each episode is already displayed, so putting it in the title is superfluous. Worse still, never use only the podcast title and/or date for the title of each episode. Consider how useless that will be to the listener scrolling through the episodes on a small MP3 player. The illustration to the right is a prime example of what to avoid. The MP3 player does not display the "Description" ID3 tag, so the listener has no way of knowing the topics of each of these podcasts.
If you want to put the podcast number in the episode title, just put it as a three-digit number right at the beginning of the name. Do not precede the number with an octothorpe (#) or the word "Episode," and do not put colon-space (: ) or space-hyphen-space ( - ) after the number. Remember, screen real estate on small MP3 players is at a premium. All those extra characters just waste space and don't add anything of value.
| Bad: | Skepticality #43 - Skeptic's Caltech Lecture Series |
| Bad: | #043: Skeptic's Caltech Lecture Series |
| Bad: | Episode 43: Skeptic's Caltech Lecture Series |
| Good: | 043 Skeptic's Caltech Lecture Series |
Descriptions can be longer than titles, but they will often be cut off after a certain number of characters in MP3 players such as iTunes. Listeners don't want to read an essay or a full transcript, they just want a quick overview of the content of the episode. Be concise. Just quickly describe the subject, or enumerate all the topics, discussed in the episode. And don't begin every episode's description with useless filler such as "In this week's episode we will..." or "For today's podcast I will interview..."
For phone interviews you don't need an outrageously expensive telephone hybrid like the big radio and TV studios use, and forget buying a cheapo, low-quality RadioShack phone interface. Just Pay $3/month for a Skype account and you can call people on their land lines or mobile phones right through Skype—and record it. Mac users can grab a copy of Call Recorder for $15. Linux users can install the free and open source Skype Call Recorder. Windows users can use the free, no frills Skype Call Recorder or cough up $50 for CallBurner
One note about phone interviews: please balance the volume of your voice and the voice of your interviewee in the final podcast. There's nothing worse than listening to a podcast in the car, turning up the volume so that you can hear the voice of the person being interviewed, then being blasted out of your seat next time the interviewer speaks and is twice as loud as the interviewee.


Copyright © 2024 Daniel G. Delaney